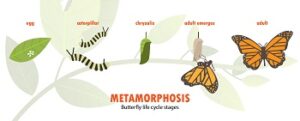
A caterpillar-to-butterfly kit makes it possible to observe close-up the fascinating transformation from a larva into a beautiful flying insect. The butterfly habitat kit lets you watch how the larvae hatch from butterfly eggs and develop into large caterpillars before entering the chrysalis stage and emerging as stunning colorful butterflies. Lets look at Caterpillar to Butterfly Kit Instructions.
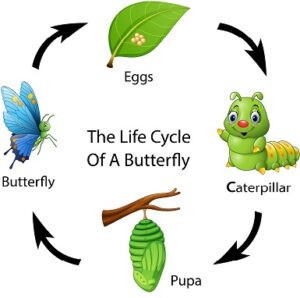
Raising caterpillars is a fun hobby, and they make easy pets for kids and adults. You only need to provide enough food and the right habitat for the creepy crawlies to grow, pupate, and metamorphose into butterflies.
But suppose you have never owned a caterpillar-to-butterfly kit. In that case, you may wonder how to care for the caterpillars successfully. Thankfully, caring for caterpillars and butterflies couldn’t be easier.
All you need to provide is a safe enclosure and food from their host plant, and the caterpillars will do the rest.
This article provides step-by-step instructions on how to care for caterpillars you want to raise indoors. Very soon, you’ll be able to observe first-hand the metamorphosis from butterfly larvae to beautiful butterflies.
Choosing the Right Butterfly Kit
The best butterfly kits typically consist of transparent tubs for the caterpillars, a chrysalis station for the pupal stage, food, and a durable mesh terrarium or habitat. Additionally, the butterfly garden kit should have an instruction manual on how to raise caterpillars into adult butterflies.
Choosing the right butterfly kit can be challenging, especially if this is your first time caring for larvae and winged insects. Shopping online for a “butterfly farm” shows thousands of results.
Here are some tips on how to find the best caterpillar-to-butterfly growing kit for your new pets.
First, decide on the butterfly species you want to raise. Some kits are more suited to native North America butterflies than others. And it’s always advisable to choose butterfly species native to your area. This ensures plenty of food locally, and you can release the butterflies into the wild.
Second, think about the number of butterfly larvae you want to raise. This factor affects the size of the butterfly cage you buy. Butterfly farms can be mesh pop-up terrariums, butterfly cages, hanging butterfly houses, and glass jars.

Next, choose a caterpillars-to-butterfly kit that includes the supplies you require. Typical supplies with butterfly kits include the following:
- Instruction book and information pack
- Pop-up mesh terrarium
- Feeding dropper
- Tub for raising caterpillars
- Food
Some butterfly kits include live caterpillars. Whether to include live caterpillars in the kit depends on when you want to raise them. Sometimes buying a kit without the live caterpillars makes sense because you have the flexibility when you want to start raising the worm-like bugs.
Setting Up the Butterfly Kit
It’s easy to set up a butterfly kit. Live caterpillars typically come in a sealed plastic tub with holes in the top. Inside, they have all the food they need to grow for seven to 14 days before they enter the pupal stage.
Some caterpillar-to-butterfly kits require you to add host leaves or foliage to the bottom of the tub and sprinkle in food for the caterpillars.
Regardless of the feeding method, always follow the manufacturer’s instructions carefully.
Suppose you want to make your own kit for raising caterpillars. In that case, you must prepare a suitable container (a one-gallon jar should be fine), soil to line the container, appropriate food, and some sticks. This type of setup is useful if you plan on sourcing caterpillars from the wild and raising them indoors.
Here are instructions on setting up your own caterpillar home:
- Choose a one-gallon glass jar and use cheesecloth and a rubber band to seal the top.
- Line the base of the container with soil or a piece of paper towel. However, if the caterpillar species pupates in the ground, you need a two-inch layer of slightly damp soil.
- Place some sticks in the jar. This gives the caterpillar a place to pupate.
- Ensure the container is always humid but not overly damp.
Caring For the Caterpillars
Once your caterpillars have settled into their new home, it’s time to start caring for them.
To keep your caterpillars healthy and happy, you should try to mimic their natural environment as much as possible. This means keeping the jar at a comfortable temperature—around 75°F (24°C) is ideal—and providing plenty of food for the caterpillars to eat.
Some caterpillar-to-butterfly kits specify that you don’t need to do anything other than watch them grow. This is because the kit comes with a packet of special caterpillar food that is designed just for them.
If you make your own caterpillar kit, you will need to provide food. It’s essential to use leaves from the caterpillar’s host plant. So, these are typically from the type of plant where you found the larva. However, you must discover the caterpillar’s species if you don’t know the host plant.
It’s good to note—caterpillars don’t eat dried or old leaves. Therefore, you must supply them with a constant supply of fresh, green leaves.
You’ll also need to monitor the humidity levels in the jar. Caterpillars do best in warm, humid conditions. Therefore, use a spray bottle to mist the foliage occasionally. But remember that caterpillars don’t drink liquids. So, you don’t need to give them a bowl of water.
Caterpillars typically grow ten times their original size before pupating. Before the caterpillar enters the pupal stage, it will stop eating and may appear sluggish. It may also become more active as it looks for a place to pupate.
Here are some top tips on caring for caterpillars:
- Keep the jar at a comfortable temperature (around 75°F/24°C)
- Provide plenty of fresh, green leaves from the caterpillar’s host plant
- Keep the container away from direct sunlight
- Remove condensation from the side of the jar unless the caterpillar has already entered the pupal stage
Preparing For the Transformation of the Caterpillars
 A sign that a caterpillar is ready to become a chrysalis (enter the pupal stage) is that it hangs from a stick or lid of the container in a “J” shape. Then, its body will turn into a chrysalis, and it sheds a thin layer of its outer skin—called an exoskeleton.
The most vulnerable stage of the butterfly life cycle is when the chrysalis is forming. Therefore, you must avoid disturbing the butterfly home for three or four days while the process occurs. Then, you can transfer the chrysalides to the mesh terrarium.
If you have purchased an all-inclusive kit, follow the caterpillar-to-butterfly instructions for transferring the chrysalides. This usually involves placing them on the chrysalis station to hang against the vertically-placed lid.
If you created your own caterpillar-to-butterfly setup, you could transfer the sticks with chrysalides into the mesh terrarium and lay them carefully against the side.
Interesting fact about raising butterflies: Caterpillars don’t form a cocoon; instead, they form a chrysalis with a hard exterior that is seen hanging from a tree. On the other hand, moths form cocoons, and these are typically soft pupae and are formed in the ground.
The Emergence of Butterflies
It takes seven to 14 days for a butterfly to emerge from the chrysalis. A tell-tale sign that the butterfly is about to break free is that the chrysalis turns darker. At this point, you should be able to see the outline of its body and wings in the chrysalis.
You can prepare the terrarium before the butterflies emerge. To do this, you can make a sugar-water mixture called nectar. You can dissolve one teaspoon of sugar with 3 fl. oz of water. Put some cotton wool in the sugary liquid and place it on a small plate.
Butterflies also feed on old fruits. So as a tasty treat, you can put some old bananas, chopped-up apples, or oranges in their enclosure.
Flowers are an important food source for butterflies. You can also use the butterfly feeder (the smaller pipette in the kit) to drop the sugary liquid onto the flowers to attract them once hatched.
A butterfly emerges from the chrysalis relatively fast. During this time, you may see drops of red liquid called meconium dropping from its abdomen. This is completely natural, and it’s nothing to worry about. Therefore, you may want to put a tissue paper liner under the chrysalides to prevent them from staining the terrarium.
 After emerging from the chrysalis, a butterfly must dry its wings before flying. You will see the butterfly hanging upside down from a branch as its wings gradually unfold. The wings usually take one to two hours to fully expand and harden.
After this time, the butterfly will start flitting and fluttering around the terrarium. After that, you can decide to keep the butterflies at home or release them into the wild.
You can now celebrate the fact that you have successfully reared a caterpillar into a fully-grown adult butterfly.
FAQs- Caterpillar to Butterfly Kit Instructions
Do butterfly kits need sunlight?
Butterfly kits should be in a bright room; however, keeping them out of sunshine is crucial. Direct sunlight causes the inside of the jar or container to heat up and cause condensation. Unfortunately, too much heat and humidity cause the caterpillars to get sick and die.
What time of year is best for the butterfly kit?
Spring or summer is typically the best time to start a butterfly kit. During this time, butterfly larvae begin emerging from eggs and feeding on vegetation. Additionally, fresh, young plant leaves are plentiful, so there is plenty of food for the caterpillars.
What is the food at the bottom of the caterpillar cup?
Caterpillar-to-butterfly kit contains all the food caterpillars need to reach the pupal stage. This nutritious mixture contains the equivalent nutritious value of up to 200 leaves per caterpillar. This allows caterpillars to increase their body mass by 10,000 fold in two weeks.
Where should I put my butterfly habitat?
Your butterfly habitat should be in a warm, bright location, away from drafts or direct sunlight. The ideal temperature range for your butterfly habitat is 72°F to 78°F (22°C to 25.5°C).
Conclusion-Butterfly Kit Instructions
In conclusion, raising a caterpillar to a butterfly is an exciting and educational experience for all ages. With the right planning and the proper supplies, you witness first-hand the transformation from an ugly grub into a beautiful butterfly.